Sunday, January 27, 2013

How to: Get baby poop out of carpet

Naked Baby Time is getting tricker since starting solids. I try to give Itty Bitty plenty of time to "air out" since it gets so hot here, and my carpet is paying for it. 

Earlier this week we went to the beach. I tried SO hard to keep sand out of the baby's mouth, but alas, I failed. She built a sandcastle in my living room the next day. Talk about a total fail. 

This morning I noticed she was a little too quiet. To my "delight" I found a very happy and entertained baby. Apparently poop is fun to play with. Yes, she was sitting (on the carpet) in a pile of pooh, just as happy as could be digging around (GAG!). Thankfully, I stopped her just as the fingers were heading for the mouth. 

Now my dilemma. We rent, and I would, at some point in time, like to get my security deposit back. Oh what to do? 

Off to Facebook I went, seeking the advice of my more experienced mommy friends. I got a lot of great ideas... but the most effective one would not work on my not-white carpet. Again, I would like my deposit back, and a peroxide stain might not be conducive to the end goal. I also do not like using chemical carpet cleaners. So I tried something on a whim, and it worked AMAZING! Here goes: 

How to naturally clean carpet stains: 
You Will Need
Glass Jar
4c HOT water
1/2c 20 Mule Team Borax
White Cloth

Directions:

1) Pick up any solids and dispose in toilet 
    (This is THE MESS)


2) Mix 4c HOT water and 1/2c 20 Mule Team Borax in the glass jar 

3) Using a white cloth, sponge/blot mixture onto stain until it is gone


4) Let carpet dry


5) Vacuum 


This worked on a 3 day old spot I had already tried to clean (the sand castle), as well as the new mess. 

Happy Cleaning! 


Tuesday, January 22, 2013

Mom's Coconut Granola Trail Mix

Just wanted to post a quick granola recipe I came up with that turned out to be quite good... better (for you) than the store bought kind, and super easy:

Mom's Coconut Granola Trail Mix

1c Oats
1/2c Shredded Coconut
1/4c ether honey or maple syrup
1-2c your favorite mix-ins (chocolate chips, nuts, dried fruit, etc)

Directions:

Pre-Heat oven to 350*
Blend oats and coconut together. Add sweetener and mix well.
Spread on a cookie sheet and toast 20-30min, until just crunchy
After oats cool, add in your favorite mix-ins and store in individual snack bags or large container

Monday, January 14, 2013

Teething, UGH!

There is no pain like tooth pain (except, maybe labor). I can not fathom what these poor babies are really feeling while teething. Itty Bitty is in the process of cutting two new ones at the moment. It is a little known fact that redheads have a lower pain tolerance than others. Thanks for the genes Mom and Dad. Needles to say, my ginger babe is miserable right now. 

This post is dedicated to those things we love to help ease teething pain. Please comment with your favorite (natural) suggestions. 

Momma's Top Teething Solutions: 
  1. Hylands Teething Tablets: I know there has been some controversy over the use of Bella Donna, and ingredient in these tablets. I have done my research and am satisfied with the safety of this product. Not just satisfied. I love them. Hylands rock. 
  2. Baltic Amber: The stones are NOT to chew on. You really should not get the necklace/bracelet wet. Babies body heat causes the stones to release an acid that is a natural anti-inflammatory and helps relieve the pain and excess drooling. They must be in contact with the skin to be effective. Inspired by Finn is a great site to order from.   
  3. Celery/Carrot Sticks: Itty Bitty loves them right out of the fridge. I would only give this to older babies (6m+) and watch them VERY closely. 
  4. Mesh Feeder: I fill Itty's up with chunks of frozen apple, banana, or blueberries (the berries make a HUGE mess, FYI). You could even just used crushed ice. This really is a must have though. 
  5. Chamomile: I talked about Chamomile in a previous post. It is so great for soothing. Brew a bag of chamomile tea, soak a washcloth in it. Let the cloth cool in the fridge, then give to baby. 
  6. Sophie: yes, the $20 squeaky hunk of plastic. Worth every penny.
  7. Teething Biscuits: See below for a super yummy make at home recipe. 
  8. Nursing: It just solves every problem Itty Bitty has. She is a milk monster. I think the pressure on her gums is soothing also. 
So what are your tried and true solutions? 
 
I have a thing against most pre-packaged baby food. The wholesome, organic pre-packaged food I would buy is wayyyyy out of my budget. So I make a lot from scratch. These are my favorite teethers... Itty better watch out or Momma is going to eat all her cookies:

Vanilla Maple Teething Biscuits:
1 egg yoke (beaten)
3 tbsp pure maple syrup
1 tsp pure vanilla extract
1 1/2 tbsp oil (I like coconut)
1/4c milk (I use Almond)
1 tbsp oatmeal (baby cereal or ground)
1 c whole wheat flour 

1) Pre-heat oven to 350*F 
2) Blend first 5 ingredients, add oatmeal and flour
3) Turn dough onto a floured surface and roll thin
4) Cut into desired shapes (make sure they are little hand friendly... I use the top of a
    glass and just make circles)
5) Put on an ungreased cookie sheet and bake 15min  


Aloha! 


Friday, January 11, 2013

Let's Talk Seeds

Part two in setting up our garden:

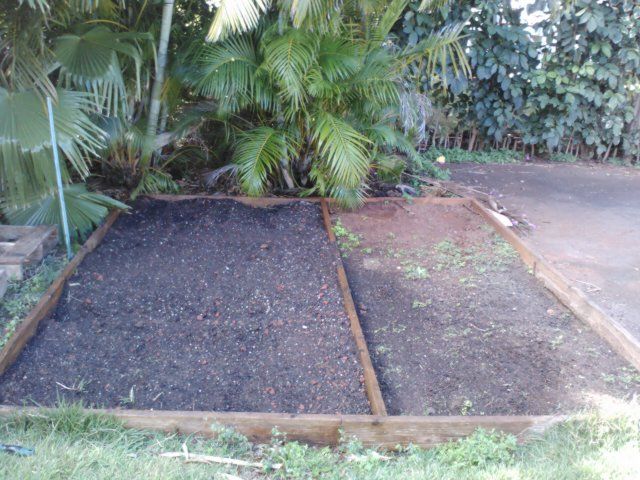
Itty Bitty and I have been hard at work getting our garden together. There were two small beds already in place when we moved in, although they were overgrown. I cleaned both out, but decided to start small and only plant one this time around. If we are successful, I may expand next time around.

This is a picture of the garden. The left side is after we cleaned, added new soil tilled and planted. The right is the side we left fallow and more of a "before" picture.

Uploaded from the Photobucket Android App

I made the choice to use seeds rather than starter plants. It was hard for me to find a local farmer with seedlings for sale, and I did not want to buy from a big-box store like Walmart. I wanted to know how the plant has been treated from the moment it entered the soil. 

I was not prepared for the effort needed to pick out some simple seed packets.
Hello Google! 

It turns out Monsanto purchased a company called Seminis in 2005. Seminis has 40% market share for all the vegetable seeds sold in the US. Not all the companies under the Monsanto/Seminis umbrella produce GMO seeds, but they do all funnel your money right back to the mothership. Here is a list of all the seed companies owned by Monsanto/Seminis:

Audubon Workshop
Breck’s Bulbs
Burpee
Cook’s Garden
Dege Garden Center
Earl May Seed
E & R Seed Co
Ferry Morse
Flower of the Month Club
Gardens Alive
Germania Seed Co
Garden Trends
HPS
Johnny’s Seeds
Jungs
Lindenberg Seeds
McClure and Zimmerman Quality Bulb Brokers
Mountain Valley Seed
Nichol’s
Osborne
Park Seed
Park Bulbs
Park’s Countryside Garden
R.H. Shumway
Roots and Rhizomes
Rupp
Seeds for the World
Seymour’s Selected Seeds
Snow
Spring Hill Nurseries
Stokes
Territorial Seeds
T&T Seeds
Tomato Growers Supply
Totally Tomato
Vermont Bean Seed Co.
Wayside Gardens
Willhite Seed Co.


There are many (smaller) companies that provide an amazing, quality,  product without trying to own or genetically change our food. The Safe Seed pledge is an amazing project. You can learn about it HERE as well as get a list of LOCAL companies in your area selling safe seeds. 
Moral of the story... do your research. Don't encourage the destruction of our planet by greed. Know what you are growing and how it is treated. 
*Hops off Soap Box*
I ended up planting some Chamomile, Basil, Cilantro, and Parsley from Seeds of Change and Tomato, Cucumber, Green Bell Pepper, and Lettuce from Ferry Morse. Yes, Ferry Morse. I checked the list of Safe Seed pledgers when I purchased the seeds and this company had signed. It was only later, after the seeds were in the ground, I discovered they were owned by Monsanto. Shame on me for not doing due diligence first. Lesson learned. 
The next phase of our project will be setting up a small compost bin to help nourish our plants. 
Please pray they grow! 


Natural Flu Treatment for Baby

Aloha All! 

This year's flu season has me scared. It has not struck here as bad as the mainland yet, but I thinks it's only a matter of time. Pre-teen got vaccinated because she goes to public school. I felt the benefit out weighted the risk in her case, especially with an infant at home. I have chosen not to vaccinate Itty Bitty for the time being... a discussion for another post. My hope is that *IF* pre-teen gets the flu, it will not be as bad, and hopefully my little milky monster will be protected by my antibodies. However, I spent the afternoon researching natural/homeopathic remedies suitable for an infant, just in case.

Before we get into the good stuff, I must post this disclaimer. I am not a doctor, nor do I have any medical training. I am just a mom doing some google work. Please heed the advice of your medical professional. OK, on to the info...

Prevention is important: this is all the stuff you already know you should be doing with the little ones. Good habits start young. Each of these measures help support healthy immune function so their bodies can fight off illness without getting sick.
    Clean Hands
    Healthy Diet
    Stay Hydrated
    Minimize stress
    Sleep
If your baby does get sick, here is a quick reference to tell if it is a cold or the flu:


Here are a few baby safe home remedies to ease the most painful symptoms if/when your little one does become sick: 

Congestion/stuffy nose:
Saline Drops and a bulb syringe
Place a few drops in each nostril and gently suction. Breast milk works in place of saline drops as well. 

Home Sauna
Close up your bathroom and run a hot shower, Put a Vapor Disk (see below) under the water, sit in the room with LO like a sauna. The essential oils in the disks are associated with relieving congestion, opening airways, and soothing. The steam from the shower helps keep membranes moist and loosens up nasal and chest congestion.  

Keep Baby Propped Up
This just helps keep airways open 

Sore Throat:
Honey and Lemon Juice
(not for babies under 1 year due to risk of botulism in honey) 
Lemon juice dries up mucous and the honey is soothing on the throat. 
Mix 1tbsp of each in a cup and heat just until warm. Drink slowly

Frozen treat
Give baby a frozen washcloth, fruit juice popsicle, or ice cube to chew on. You could even put frozen fruit in a mesh teether. The idea is to get the cool, soothing liquid on the throat. 

Tummy ache: 
Chamomile
Give little one tsp of brewed tea 3-4x a day
and/or
mix 2-3 drops chamomile essential oil with 2tbsp of a carrier oil (I like coconut) and give a gentle tummy massage. 

You can also check with you local naturopath or health food store for holistic medicines that are safe for babies.

Add plenty of rest, fluids, and extra snuggles and hopefully little one will be better in no time. 

Wishing good health to you and your family! 

Vapor Disks
You will need:
A muffin pan and liners
1c baking soda 
1/3c water
eucalyptus, lavender, and rosemary essential oil (optional, chamomile) 

Directions:
Line the muffin tins
Mix baking soda and water
spoon into tins
Bake at 350*F for 20min
When disks are cool, add 2-3 drops of each oil to the disk.
Leave disks in the liner, seal in a bag or container and use as needed. 


Monday, January 7, 2013

Crafty Crafty

I love to craft. Its the feeling of creating something unique and beautiful... being able to say "I made that." Needless to say Itty Bitty hates Pinterest, or rather, me on Pinterest, (check out my boards here) and the many oh so cute baby girl things one can create. She would be in big trouble if I ever get a sewing machine.

Today's project was a crochet adult headband for a friend. This was my first time creating my own crochet pattern, and I think it turned out pretty good! Here is the pattern if you want to try this at home:  


Adult Tapered Headband

Key:
Ch= chain stitch
DC= Double Crochet
DDC= Decrease Double Crochet

Pattern:
Row 1: Ch 5, turn
Row 2: DC in 3rd chain down, DC in remaining 2 chains, Ch1, turn
Row 3: 2 DC in first chain, DC, 2 DC in last chain, Ch 1 turn
Rows 4-5: [DC in each stitch, Ch 1 turn] repeat  
Row 6: 2 DC in first stitch, DC in stiches2-4, 2 DC in last stitch, ch 1, turn
Rows 7-8: [DC in each stitch, ch1, turn] repeat  
Row 9: 2 DC in first stitch, DC in stitches 2-6, 2 DC in last stitch, ch 1, turn
Rows 10-12: [DC in each stitch, ch1, turn] repeat
Row 13: 2 DC in first stitch, DC in stitches 2-8, 2 DC in last stitch, Ch 1, turn
Rows 14-36: [DC in each stitch, ch 1, turn] repeat
Row 37: DDC, DC in next 7 stitches, DDC, ch 1, turn
Rows 37-39: [DC in each stitch, ch 1, turn] repeat
Row 40: DDC, DC in next 5 stitches, DDC, ch 1, turn
Rows 41-42: [DC in each stitch, ch 1, turn] repeat
Row 43: DDC , DC in next 3 stitches, DDC , ch 1, turn
Row 44-45: [DC in each stitch, ch 1, turn] repeat
Row 46: DDC , DC in next stitch, DDC, finish off

Attach a button to the bottom of one end to fasten the headband closed

I created a 3 layer flower clip to attach for some bling, that pattern coming soon!


You can check out my Etsy Store, Lana's Closet to see some of the other fun stuff I make. 

Happy Crafting! 

Saturday, January 5, 2013

Adventures in Gardening

Aloha! Welcome to my blog.

My goal this week is to create a small organic garden to grow some herbs and veggies. I have had many gardens in the past, some more successful than others. My last attempt resulted in a rogue white watermelon vine taking over the entire patch. Yes, I had even purchased the wrong seeds, and my family was not a fan of the white variety.

So today Itty Bitty (my 8 month old) and I cleaned out an old garden patch in our front yard. Then I got on google to figure out where to start with this organic thing. Here is what I learned so far:
1) I am blessed to live in a place where most everything I want to grow is "in season" all
    year. Yay Hawaii!
2) Organic is not as scary as it sounds, and my plants are not left to fend for themselves.
    Something called Neem Oil will be my BFF
3) Good soil and compost/fertilizer are important. This will be a whole other blog.

So I have several things to accomplish this week. Forgive me for using this post as my "to-do" list... a trip to the home improvement store for good planting soil and starter plants, recruit the pre-teen to help with planting, research how to start a compost, and pray I finally do this right LOL. Look for updates this week!